Original Dateline: December 2008
Updated: February 2017
Please Note: This photo essay is a little outdated. Some very important changes have been made in the Whizbang cidermaking system since 2008. This essay now serves to show the evolution of the Whizbang cidermaking system. I have updated the text to point out the changes.
###
Let's begin with the Whizbang apple grinder. That's it below, setting in my kitchen. The grinder is a souped-up food waste disposal (a.k.a., a garbage disposal) mounted in a convenient stand.

Chapter Three of my planbook tells you everything you need to know to make the apple grinder. First, I tell you all about garbage disposals—how they work, which ones are best for making an apple grinder, how to save money buying one, and how to modify it to be a Whizbang apple grinder (Update: Click Here for some updated information on modifying a garbage disposal for grinding apples).
In the picture below you can see ground-up apple mash flowing out the grinder drain pipe. The Whizbang apple grinder turns apples into an exceptionally fine, juicy mash. The quality of the mash far exceeds what you'll get from any other home-scale apple grinder on the market. You would have to spend a small fortune on a commercial hammermill grinder like the big cidermaking operations use to get mash on par with what the Whizbang apple grinder turns out.
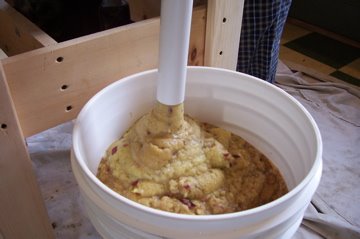
A bushel of apples (42 pounds) renders a pail of mash, like you see below. The mash comes out white but quickly oxidizes to a brown color.

In the next picture, we have washed apples on the kitchen table. The apples have been halved or quartered so they will fit down into the disposal opening. It isn't absolutely necessary that the apples be cut up, but the feed more quickly and easily when they are.
It takes only a few moments to slice the apples. And while I'm at it, I cut out any bad spots that I see. I'm real particular about the fruit I use to make cider. The apples needn't be picture perfect, but they need to be clean and free of rot and mold and worms.
Note that the "apple corral" is on the grinder and it is full of apples. And notice too that the Whizbang press is right there in my kitchen. The press is lightweight and can be brought right into the kitchen for pressing on cold winter days. A basement or garage might be a better place, but I don;t have a basement or a garage.

My son is feeding apples into the grinder. He is using the "apple persuader" (page 13 in the book) to help jam the apples down into the grinding chamber. The Whizbang apple grinder will gobble down apples as fast as you can feed them into the grinding chamber. It doesn't overheat. It doesn't stall. It is an amazing machine.

Here's another view of the grinder and mash-filled buckets. You might be wondering how easily the grinder cleans out when you're done using it. Well, it cleans out quickly and easily, right there in the kitchen. No mess. No fuss. I tell you how on page 16 of my plan book.

Here's a view of the Whizbang cider press. This corresponds to the illustration and parts diagram on page 6 of the plan book. And chapter Four of the book tells exactly how to make the press frame. As you can see, the Whizbang press does not use an Acme screw to put pressure to the tub of mash. Instead, it employs a common automotive scissors jack and a 2x6 pressing shaft. This simple technology is superior to an Acme screw—it's faster and easier to use.

That white thing on top of the pressing tub is the "pressure plate." The square-shaped "curb" on the top is sized to accept the end of the 2x6 pressing shaft.

This picture shows the pressure plate on the pressing shaft and the shaft elevated above the tub. Two dowels in the shaft serve to hold it up out of the way.

Here's another view showing the pressure plate connected to the 2x6 pressing shaft. Observant book readers will notice that the curb is not screwed together as shown in the book. That's okay, just follow what the book says.
Have you noticed how beautiful the wood-slat pressing tub is? Those are maple slats coated with polyurethane. The hoops are 1/8" HDPE plastic. Chapter Five in my plan book tells you exactly how to make a pressing tub like that. It's easy to do if someone shows you how. You can use common pine for the slats and save money. (Update: A less expensive pressing tub option is to use 1/8" HDPE plastic, as shown and explained at This Link)

In the picture above you can see the tub sets on a drain rack inside the bottom pan. (Update: I have determined that the bottom rack is completely unnecessary. I never use it any more.)
The bottom pan shown in these pictures is HDPE plastic. But you can make a drain pan out of pine and plywood and seal it with polyurethane. (Update: I now sell stainless steel bottom pans with a spout. A great option. Click Here for details)
Notice that the drain pan slides ahead to allow easy filling of the tub.
This next picture shows the pressing tub lined with a polyester pressing bag from Lehman's Hardware.

Important Update: I completely changed my pressing technique after publishing the first printing of my plan book. I no longer use a pressing bag in the tub. I do not recommend that you use a pressing bag. Pressing one large bag of apple mash does not press out juice efficiently. Click Here to see a much better approach to pressing cider.
There is a bucket of fresh mash (it hasn't even oxidized yet) ready to put into the pressing tub.

What you're looking at next is a "pressing disc" in the mash. These discs are discussed on page 8 of the plan book. They are layered up within the mash and help to distribute pressure more evenly, extract juice faster, and press the fine pulp more thoroughly. The pressing discs shown in these photos are made of HDPE plastic. They could just as well be plywood coated with polyurethane.

Update: I no longer recommend that the pressing discs be layered in a tub of mash as you see here. The mash presses out so much better if it is in individual bags, separated by pressing discs. Click Here for details.
Do you see the cider in the collection pan? That's a lot of cider and pressure hasn't even been applied to the mash. That's the beauty of "Whizbanged" apple mash; the cider starts to pour out even before you put pressure to it, and such mash will render more cider than coarser mash from other grinders.

Next, the pressing bag is pulled up and tied down tight to the mash.

Next, we have the pressure plate and 2x6 pressing shaft down in place on the mash. It's ready to PRESS.

Since the tub is only half full of mash, the scissors jack needs to be blocked up to the top beam. This is easily and quickly done. The jack (which I got out of the trunk of my car) works fast and easy.

Wow. Look at the cider flow. It's a beautiful thing.

There you go. Just-squeezed apple cider. One of the most delicious and wholesome beverages on earth!

Once the mash is pressed, the tub is removed, and you have a pressing bag with pomace (pressed-out apple mash is called pomace).

Here's another view of the apple pomace. The pressing discs have done their work. The mash goes on the compost pile.

Update: That pomace is not pressed out nearly as well as it would be with the revised pressing technique I now use. When separate bags of mash are placed between the pressing discs, more juice is squeezed out, and it is squeezed out faster.
Well, here we are back slicing apples for the grinder. Note that the apples in the bowl are a little blemished. That's not a problem when it comes to making cider. I'll bet there are millions of bushels of less-than-perfect-but-still-good-for-cider apples that go to waste in America every year. Don't let such apples go to waste! Make cider. Gallons and gallons of it. It's easy to do and downright fun with the Whizbang cidermaking equipment that my plan book tells you how to make.

How many of those other apple grinders and cider presses on the market can be toted right into the kitchen on a bitter cold autumn (or winter) day? Though I typically press cider outside, it is possible to grind and press indoors.

An automotive scissors jack puts one to two tons of pressure to the mash. That's enough to get the job done. But a little six-ton hydraulic bottle jack like shown in this next picture provides a nice excess with which to press cider.

And finally, here is another pressing tub option, which I discuss in my plan book. You can make a dandy one-bushel-capacity pressing tub out of a food-grade pail.
